 Blog contributed by Jannah Haas of Angry BBQ
The more we use BBQ, the more we find ourselves using one grill to prepare majority of our meals; summer or winter alike. We love our grills for three simple reasons.
- We can prepare a quick weeknight meal in 30 minutes or less.
- Using the grill, often allows for overall healthier eating (if you are picking the right foods).
a. Grilled meals have less fat as it drips off the grates.
b. Veggies prepared on the grill retain delicious crunch and colour
c. Grill masters tend to use less butter. Grilling seals in moisture making one less inclined to grab the butter or other condiments, typically used to liven up the food. - Our personal opinion; nothing can beat the traditional grill flavour.
Picking out and preparing the entree is typically the easy part. Traditionally, a BBQ meal often meant a lot of meat, maybe a potato and a quick garden salad. This would be my husband’s dinner every night if had his way. However, it does not have to be this way. There are so many delicious sides you can prepare on the grill to accompany whatever entree you’ve chosen.
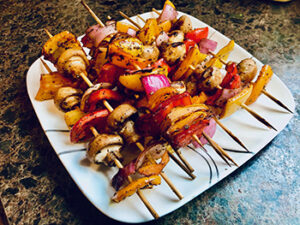
Marinated Grilled Veggies
Our first pick and most heavily “go-to” BBQ side would have to be the family favorite: Marinated Grilled Veggies. I first tried this delicious recipe when dating my husband many moons ago. My mother-in-law served them, and I just could not believe how tangy these simple vegetables could be. I quickly asked for the recipe and received a sticky note with the following instructions:
Vegetable Marinade
“lots of soy sauce”
“not much” olive oil
white wine vinegar (not as much as the soy sauce)
“little bit” of sugar
oregano and basil to taste
Plenty of room for error, when I was a naive 20-year-old! I have since prepared these many, many times. I now too will often just toss the ingredients into the bowl until it all looks about right; but I did figure out more definite measurements for the not so brave or “play it by the book” chef.
The Recipe
Serves 4-6
Equipment:
Grill (Charcoal is our go to)
Mixing Bowls: one small, one large
BBQ Tongs
BBQ Skewers
Ingredients:
1 Red Bell Pepper
1 Yellow Bell Pepper
1 Orange Bell Pepper
½ large Red Onion
1 pound Mushrooms
*Substitute in Eggplant, Yellow Squash, or Zucchini : whatever your favorite veggies are! The possibilities are endless; do not be afraid to experiment.
Marinade:
¾ cup soy sauce
2 Tbsp olive oil
5 Tbsp white wine vinegar
1 tsp sugar
1 Tbsp basil
1 Tbsp oregano
Instructions:
- Chop peppers and red onion into approximately 2 x 2 chunks. Remember veggies reduce in size when grilling so don’t be scared of making them too large!
- Place chopped peppers, onions, and whole mushrooms into a large mixing bowl.
- In a small mixing bowl combine and whisk together soy sauce, olive oil, white wine vinegar, sugar, basil, and oregano.
- Pour Marinade over veggies.
- Cover and let marinade for at least 4 hours in the refrigerator. **Essential step; don’t skimp on the marinade time, you’ll regret it.
- Soak skewers in water for 20 min. Place veggies on the skewers; arranging as desired.
- Preheat grill to medium heat (375-400 degrees Fahrenheit). A charcoal grill really gives these vegetables a nice taste.
- Oil grates of the grill with vegetable oil (using a brush)
- Once the grill is at the desired temperature; place skewers on the grill and grill each side approximately 4 min. Veggies should appear tender and lightly charred.
- Serve immediately.
Grilled Corn on the Cob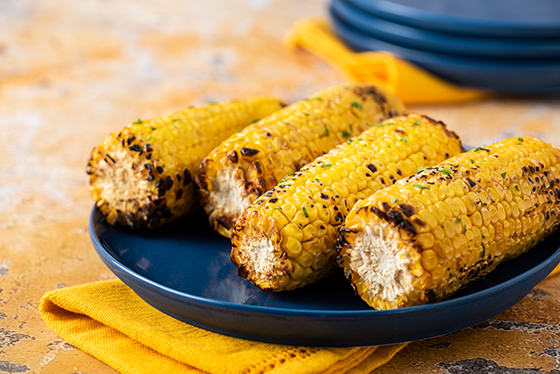
Our second pick goes to the simple and quick corn on the cob. Fresh corn on the cob; by rights has to be one of the simplest, yet tasty BBQ sides. It took a little bit of playing around to find a recipe that added a little zing to corn on the cob; but this one surely takes the cake and accompanies anything off the grill. My personal favorite aspect of serving corn on the cob? The kids love it too! Our little AngryBBQ family loves the cilantro and lime flavors in particular; so we use both in this recipe. However, we have added substitutes in case those flavors are a little too strong for your tastebuds!
When grilling corn on the cob, I tend to shuck the corn first (peel off all the husks and expose the corn). I do this simply because I’m typically in a rush and trying to get supper together fast! If you are wanting a fancier approach, you can shuck the corn; folding back the husks (but not removing them entirely) and then tying the husks together (while still attached to the cob).
The Recipe
Once the cobs are prepared, the grilling process is super quick!
Equipment
BBQ Tongs
BBQ Mop/Brush
Gas, Pellet, Charcoal Grill, or an indoor grill.
Ingredients
4 x Shucked ears of corn
1 TBSP Extra Virgin Olive Oil
¼ cup Unsalted Butter
½ Tsp minced garlic (can substitute with ¼ tsp garlic salt)
¼ Tsp Thyme
¼ Tsp Smoked paprika
1 1/2 TBSP chopped, fresh cilantro
½ tsp lime juice
Kosher Salt to taste
Directions:
- Preheat the grill to medium heat.
- Lightly coat the cobs of corn using a brush with olive oil.
- Place corn on the grill. Turn corn every 2 mins. Continue to turn the corn for approximately 8-10 min. You are looking for a nicely charred or browned look.
- Place butter, lime juice, garlic, smoked paprika, thyme, cilantro, and salt in a bowl and microwave for 20 seconds (until butter is melted). Stir.
- Brush butter mixture over each cob.
- Serve.
*Too much of a charred look? Alternatively, instead of placing the corn right on the grill, you can wrap each cob in aluminum foil. This will give you a less overall charred taste and look. We recommend also increasing your cooking time if you choose to use this method… add an extra 5-8 minutes.
* Not a lime/cilantro fan; just leave the lime juice out and substitute parsley for cilantro!
Miso Glazed Potatoes
Having a potato side seems to be a staple with most BBQ meals. I (in particular, not my husband) quickly grew bored of the plain old baked potato side or sliced potatoes slathered in butter, garlic, and spices and so I went on a hunt for something a little bit different. Enter the miso glazed potatoes! I will admit, they do take a little more work and so you might want to reserve them for weekend meals or gathering. But the little extra work is definitely worth it!
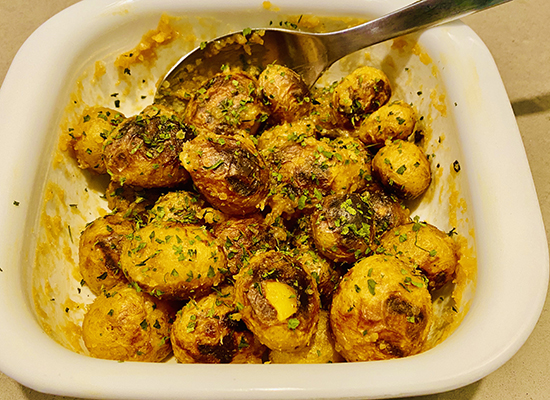 This recipe uses white shiro miso mixed with vinegar, sugar, and ginger to produce a tangy, rich glaze for the potatoes. Miso can be hard to find at small grocery stores, so look for large stores that have a decent ethnic aisle. Another quick tip for this recipe. You can boil the potatoes and prepare the glaze ahead of time. Then, when preparing supper just grill the potatoes and mix with the glaze!
The Recipe
The Sauce
Combine all ingredients in a saucepan over medium heat:
- 4 tbsp white (shiro) miso
- 2 tbsp light brown sugar
- 1 tbsp rice wine vinegar
- 1 garlic clove, finely chopped
- 1 tsp freshly minced ginger OR ½ tsp ginger powder
Bring to a simmer for 5 minutes, stirring continuously, incorporating all ingredients. Pour into a small bowl and set aside.
The Potatoes
- 1 ½ pounds baby yukon gold potatoes
- ¼ cup kosher salt
- 1 quart water
Place potatoes, water, and salt in a medium pot over medium/high heat. Bring to a boil, then reduce heat and simmer until tender, 12-15 minutes.
Drain, let cool, and pat the potatoes dry before setting aside.
- Set your grill to medium heat.
- Place the yukon golds directly on your grill, turning them often with tongs, until lightly charred. About 6-8 minutes.
- Return potatoes to a mixing bowl or place in a nice serving dish.
- Drizzle miso glaze over potatoes and toss to coat. Garnish with parsley if desired.
- Serve immediately.
There you have it! Our 3 Favorite BBQ sides! Happy Grilling!
Jannah Haas, Co-Founder![]()